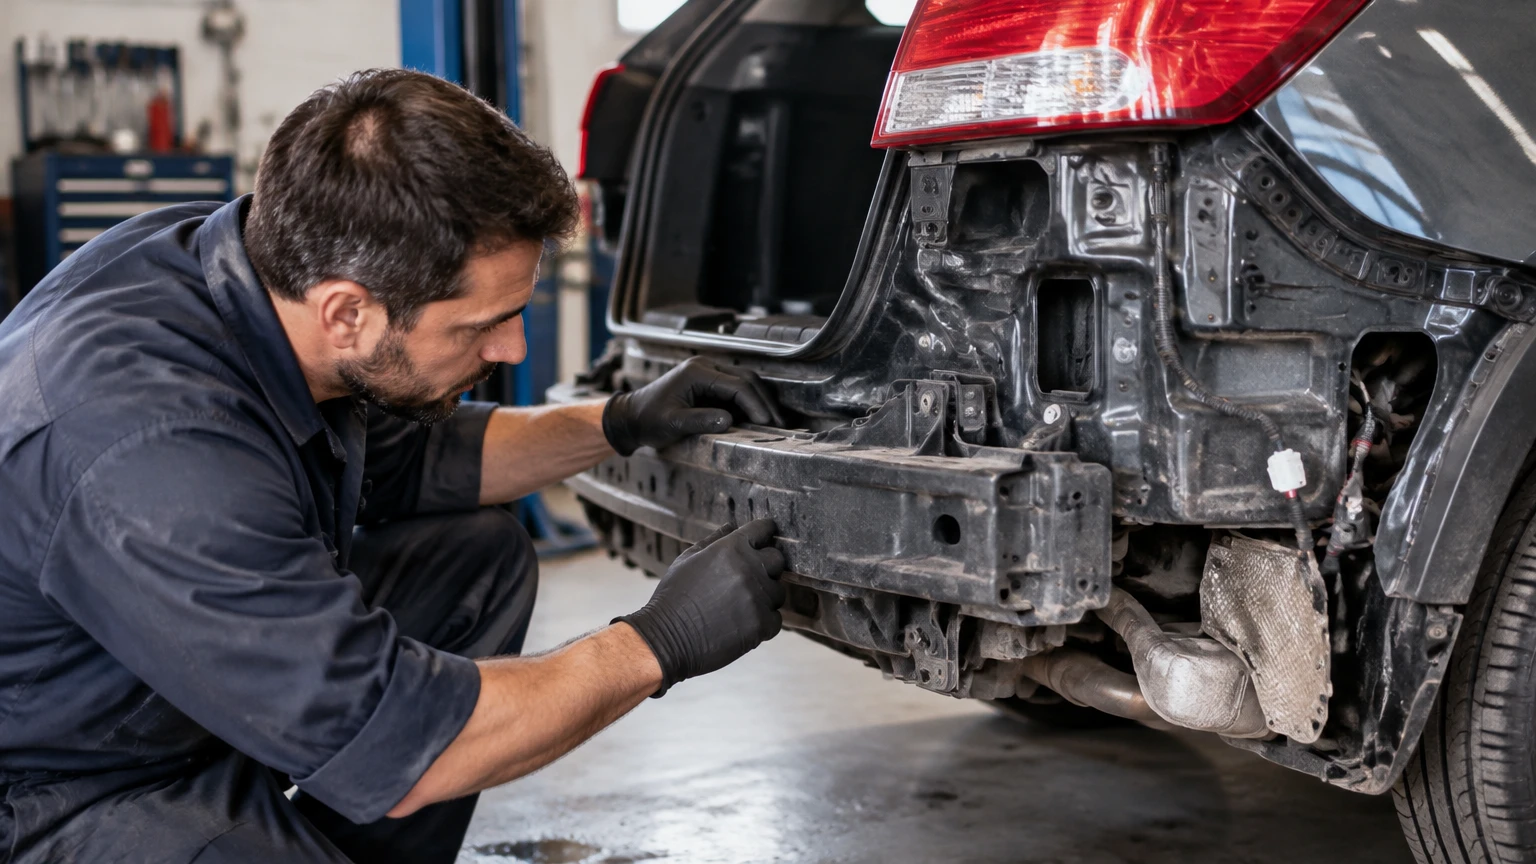
To identify hidden damage after a rear-end collision, inspect the bumper structure, trunk floor, panel gaps, suspension geometry, exhaust, wiring, and diagnostic modules in that order. Do not rely on a smooth bumper cover. A professional collision inspection, scan, alignment check, and frame measurement may be necessary before the vehicle is considered safe.
Key Facts at a Glance
A flexible plastic bumper cover can return to shape while the reinforcement bar or absorber remains crushed.
Uneven trunk gaps, rippled spare-tire wells, new tire wear, and an off-center steering wheel can indicate underlying damage.
A basic OBD-II code reader may not access blind-spot monitoring, airbag, parking-sensor, or body-control modules.
A strong exhaust smell, fuel leak, damaged high-voltage component, or airbag warning requires towing rather than a test drive.
Typical hidden-damage inspections take 1-3 hours, while teardown, structural measurement, and repair may take several days.
A collision center must remove the bumper cover to confirm many reinforcement, absorber, radar-bracket, and wiring failures.
What Is Hidden Damage After a Rear-End Collision?
Hidden rear-end collision damage is structural, mechanical, safety-system, or electrical damage beneath the visible bumper cover and body panels. The affected parts can include the bumper reinforcement, energy absorber, rear body panel, trunk floor, frame rails, suspension links, exhaust, wiring, radar brackets, and airbag-related modules.
A bumper cover is usually a cosmetic thermoplastic component. It can flex inward and rebound, while the steel or aluminum reinforcement behind it bends permanently. The energy absorber may also collapse without leaving a visible mark. That distinction explains why a low-speed impact can produce a large repair supplement.
The rear structure differs by vehicle. Passenger cars commonly use a unibody with rear longitudinal rails and a stamped trunk floor. Pickup trucks and some SUVs use a separate frame, while electric vehicles may place sensitive battery enclosures, orange high-voltage cables, or charging hardware near the rear axle.
Can a bumper look fine while the frame is bent?
Yes. A smooth bumper cover cannot prove that the reinforcement bar, crash box, rail end, or trunk floor is straight. Visual inspection identifies warning signs, but only dimensional measurement against manufacturer specifications can determine whether structural points remain within tolerance.
A small distortion may also change crash performance without producing an obvious drivability symptom. For that reason, a collision center should inspect the structure before replacing only the cover or applying cosmetic repair.
What Should You Do Before Inspecting the Vehicle?
Before inspecting a rear-ended vehicle, photograph its position, license plates, warning lights, damage, road conditions, and all fluid leaks. Avoid removing panels, clearing diagnostic codes, or accepting a cash settlement before the insurer and a qualified repair facility can document the condition.
Safety triage comes first
Do not drive the vehicle if any of these conditions exist:
- Fuel, coolant, brake fluid, or battery electrolyte is leaking.
- The trunk floor, rear wheel, or tire is visibly displaced.
- A tire rubs the body or suspension.
- The vehicle pulls sharply, the steering wheel rotates abnormally, or braking feels unstable.
- An airbag light appears, smoke comes from wiring, or a high-voltage warning is displayed.
- Exhaust enters the cabin, or occupants smell exhaust while idling.
- A rear door, trunk, or fuel door cannot latch securely.
Arrange a tow to a collision center when any safety-critical symptom is present. A short drive can convert a damaged tire, loose exhaust, or unstable suspension into a secondary collision.
How Do You Identify Hidden Damage Step by Step?
A practical inspection uses six stages: document the event, inspect exterior geometry, examine the trunk, check the underside and running gear, scan electronic systems, and obtain professional measurements. A careful preliminary inspection usually takes 30-60 minutes; a complete shop diagnosis commonly takes 1-3 hours before teardown.
Step 1: Photograph the exterior and compare symmetry
Park the vehicle on level ground and photograph both rear corners from the same distance. Record the gaps around the trunk lid, taillights, quarter panels, bumper, rear doors, and fuel or charging flap.
Look for:
- A trunk gap that changes width from top to bottom.
- One taillight sitting deeper or higher than its opposite light.
- A bumper corner that sits proud of the quarter panel.
- Buckled paint, wrinkled seams, cracked seam sealer, or displaced trim.
- New rubbing when a rear door, hatch, or trunk opens.
- A bumper that no longer follows the body contour.
A gap difference is a warning, not proof of a bent frame. Factory tolerances, previous repairs, and uneven parking surfaces can create misleading visual differences. Photograph measurements with a ruler or feeler gauge, but do not use home measurements to approve structural safety.
Step 2: Inspect the trunk floor and weather seals
Remove the trunk mat, floor board, cargo tray, and spare tire if the vehicle has one. Use a flashlight to inspect the spare-tire well, rear seat bulkhead, jack mounts, drain plugs, and seams around the tail panel.
Search for:
- Sharp folds or broad ripples in stamped metal.
- Fresh bare metal, chipped paint, or cracked seam sealer.
- Torn or stretched weather stripping.
- Damp carpet, standing water, rust, or mold odor.
- A spare tire that no longer sits flat.
- A jack or tool tray that no longer fits its molded recess.
- Rear seatbacks that fail to latch after the impact.
Water in the spare-tire well is significant because a shifted trunk opening can break the weather seal. Dry the area and arrange a controlled hose test only after the vehicle is safe; do not direct high-pressure water into lamps, radar units, vents, or charging components.
Step 3: Inspect the bumper structure and rear electronics
The bumper cover must usually be loosened or removed to inspect the reinforcement bar, absorber, brackets, crash boxes, parking sensors, radar mounts, and wiring harnesses. Do not pry the cover away if it contains radar, side-impact sensors, or high-voltage components without the manufacturer’s procedure.
| Component | Typical hidden failure | Observable clue | Proper verification |
|---|---|---|---|
| Steel or aluminum reinforcement | Bent bar or crushed mounting point | Cover rebounds but sits unevenly | Cover removal and visual inspection |
| Foam or honeycomb absorber | Permanent compression | No exterior clue or shallow cover dent | Compare with undamaged part |
| Blind-spot radar bracket | Shifted mounting angle | Warning light or false detection | Manufacturer scan and calibration |
| Ultrasonic parking sensor | Cracked mount or displaced sensor | Constant beeping or no obstacle alert | Scan, physical inspection, function test |
| Rear wiring harness | Pinched, cut, or stretched conductors | Flickering lamps or intermittent faults | Circuit testing and module scan |
A radar sensor can remain electrically functional while pointing incorrectly. Calibration therefore requires more than clearing a fault code.
Step 4: Check tires, wheels, suspension, and alignment
Inspect the rear tires for fresh scuffing, bulges, cuts, uneven tread wear, and contact marks inside the wheel well. Compare wheel position from both sides. A wheel that appears farther forward or rearward can indicate a bent trailing arm, lateral link, subframe mount, or axle component.
A cautious road test is appropriate only when the vehicle passes the stationary safety check. On a flat, low-traffic road, note whether the steering wheel is centered, the vehicle tracks straight, the rear feels unstable, or new clunks occur over small bumps.
| Symptom after impact | Possible area | Immediate action |
|---|---|---|
| Steering wheel off-center | Toe change, subframe shift, front or rear geometry | Obtain four-wheel alignment |
| Vehicle pulls sideways | Bent link, tire damage, uneven pressure | Stop if pull is severe |
| Rear clunk over bumps | Shock mount, control arm, exhaust, loose trim | Inspect on a lift |
| Tire rubs body | Wheel displacement or damaged liner | Tow if rubbing continues |
| New vibration above 40 mph | Wheel, tire, axle, or driveshaft | Avoid highway driving |
| Uneven rear tire wear | Persistent toe or camber error | Measure alignment promptly |
A wheel alignment can reveal altered geometry, but alignment alone cannot prove that the unibody or frame is straight. A vehicle may align within adjustment range even when a structural mounting point has shifted.
Step 5: Scan every relevant electronic module
Use a professional diagnostic scan tool that accesses manufacturer-specific modules, not only generic engine codes. Scan the airbag restraint system, body-control module, parking assist, blind-spot monitoring, rear cross-traffic alert, all-wheel-drive controller, battery system, and powertrain modules when equipped.
Record current, pending, history, and communication codes before anyone clears them. Compare the scan with the vehicle’s pre-crash condition when available.
| System | Possible collision effect | Verification method |
|---|---|---|
| SRS or airbag module | Crash data, sensor fault, lost communication | OEM-capable scan and manufacturer procedure |
| Blind-spot monitoring | Radar bracket or sensor misalignment | Scan plus static or dynamic calibration |
| Parking assist | Sensor displacement or broken harness | Module scan and obstacle test |
| Rear lighting | Pinched ground or damaged connector | Voltage-drop and continuity testing |
| AWD or drivetrain | Axle, propeller shaft, or controller fault | Scan, lift inspection, road test |
| EV battery system | Enclosure, cable, or isolation damage | Manufacturer-approved high-voltage inspection |
A generic OBD-II reader usually focuses on emissions-related powertrain data. It may not read airbag, radar, parking, or body modules, so a “no codes” result from a basic reader is not a clean bill of health.
Step 6: Inspect exhaust, drivetrain, and underbody clearance
With the vehicle safely lifted, inspect mufflers, resonators, hangers, heat shields, catalytic converters, driveshafts, differential mounts, fuel lines, brake lines, and underbody shields. Search for fresh contact marks and crushed mounting points.
A rear impact can push an exhaust assembly forward, crack a pipe, or bend a hanger. On rear-wheel-drive and all-wheel-drive vehicles, inspect the driveshaft slip area, differential mounts, propeller-shaft support, and transmission or transfer-case seals for impact-related movement.
Do not enter a vehicle cabin containing exhaust fumes. Carbon monoxide has no reliable odor, so a smell is an especially serious warning rather than a safe detection method.
Which Diagnostic Method Is Appropriate?
A DIY inspection is suitable for documenting symptoms and deciding whether to tow, but it cannot certify structural integrity or ADAS operation. A collision center teardown and dimensional inspection provide substantially stronger evidence for repair and insurance decisions.
| Method | Typical cost | Typical time | What it can establish |
|---|---|---|---|
| Owner visual inspection | $0-$50 | 30-60 minutes | Visible gaps, leaks, trunk deformation |
| Four-wheel alignment check | $100-$250 | 1-2 hours | Wheel-angle deviation and adjustment range |
| Professional module scan | $100-$300 | 30-90 minutes | Stored faults and communication failures |
| Bumper teardown inspection | $150-$500 | 2-5 hours | Reinforcement, absorber, brackets, harnesses |
| 3D frame measurement | $300-$600 | 2-5 hours | Structural-point dimensions against specifications |
| Full collision estimate | Usually no separate fee, varies by shop | 1-3 hours | Visible and discovered repair operations |
Prices are typical United States ranges and vary by vehicle, market, shop equipment, and insurance arrangement. A scan cannot replace a physical inspection, and a visual estimate cannot replace a structural measurement when the rear body has shifted.
When is frame measurement necessary?
Frame or unibody measurement is appropriate when trunk gaps change, the spare-tire well is rippled, suspension geometry remains abnormal after adjustment, a wheel sits out of position, or the impact reached the rail ends or rear body panel. The shop should use manufacturer dimensions and provide before-and-after measurements.
A claim file benefits from photographs of the damaged metal, scan reports, alignment printouts, teardown notes, and supplements that identify each newly discovered operation. Measurements are more persuasive than a general statement that the car “looks bent.”
How Much Can Hidden Damage Cost?
Typical hidden rear-end repair costs range from approximately $350 for sensor diagnosis and calibration to more than $8,000 for structural repair, depending on vehicle construction and parts. These are planning ranges, not quotes, and labor rates, OEM parts, paint, calibration, and rental-car costs can change the total.
| Damage category | Typical repair range | Typical time | Main cost drivers |
|---|---|---|---|
| Diagnostic scan and calibration | $350-$1,200 | 2-5 hours | Sensor count, targets, software procedure |
| Alignment and suspension parts | $400-$1,500 | 1-2 days | Links, subframe, struts, labor rate |
| Bumper reinforcement and absorber | $500-$1,300 | 1-2 days | Material, brackets, paint operations |
| Exhaust components | $300-$2,500 | 3-6 hours | Hangers, catalytic converter, access |
| Trunk floor or rail repair | $2,000-$8,000 or more | 5-10 days | Measuring, pulling, welding, refinishing |
| Water intrusion and interior repair | $500-$3,000 | 1-5 days | Carpet, corrosion, modules, drying |
An insurer may initially authorize only visible bumper work. A teardown supplement is appropriate when removal exposes crushed absorbers, bent reinforcement, broken sensor brackets, distorted rails, or hidden harness damage.
What Problems Appear Days or Weeks Later?
Delayed symptoms commonly include water in the trunk, intermittent sensor warnings, tire wear, battery discharge, new rattles, and exhaust fumes. These failures may emerge after rain, repeated suspension movement, temperature changes, or a module completes its post-crash self-test.
Monitor the vehicle for the first several weeks:
- Check the spare-tire well after the next substantial rain.
- Measure tire pressure weekly and inspect new tread wear.
- Watch for blind-spot, parking, airbag, ABS, or stability-control warnings.
- Listen for rattles over the same road where no noise existed before.
- Check whether the trunk seal remains evenly compressed.
- Look under the vehicle for fresh drips or displaced exhaust parts.
- Note battery drain, flickering lamps, or intermittent rear-camera failure.
Keep dated photographs and repair records. Delayed evidence is harder to attribute if a vehicle is driven extensively or repaired without documentation.
Which Vehicles Need Extra Inspection?
Electric vehicles, hybrids, AWD vehicles, pickups, and vehicles with extensive ADAS require additional checks because rear impacts can affect high-voltage systems, driveline components, frame structures, or sensor calibration.
Electric and hybrid vehicles
A qualified technician should inspect battery enclosures, isolation resistance, orange cables, rear crash structures, and battery-management fault codes. Do not touch orange cables or remove covers without the required training and manufacturer procedure.
Pickup trucks and body-on-frame SUVs
Inspect the frame rails, crossmembers, hitch receiver, bed mounts, spare-tire winch, fuel tank, and rear axle location. A bumper may appear intact while the hitch or frame transfers force into the rails.
AWD and rear-wheel-drive vehicles
Check the driveshaft, differential mounts, rear subframe, axle shafts, and transmission or transfer-case seals. New vibration, binding, leaking fluid, or a clunk during acceleration deserves a lift inspection.
Older vehicles without ADAS
Older vehicles have fewer radar and camera calibration issues, but structural rust, brittle wiring, damaged fuel lines, and unavailable replacement parts can increase repair risk. A low market value does not make structural damage safe to ignore.
What Are the Most Common Inspection Mistakes?
The most common mistake is treating cosmetic appearance as a safety assessment. A second is relying on a generic code reader, which may not access collision-related modules. A third is approving repairs before the bumper and trunk structure are fully inspected.
Avoid these errors:
- Accepting cash at the scene: A later teardown may reveal damage that was invisible immediately.
- Driving a poorly tracking vehicle: An alignment symptom can indicate suspension or structural displacement.
- Clearing codes before recording them: Erased history removes useful evidence for diagnosis and insurance.
- Approving bumper replacement alone: The reinforcement and absorber may be the parts that failed.
- Skipping post-repair calibration: A radar that is mounted a few millimeters incorrectly can produce incorrect detection zones.
- Assuming an alignment proves structural integrity: Alignment measures wheel angles, not every structural datum.
- Using high-pressure water for a leak test: Water can worsen damage to lamps, sensors, connectors, and EV components.
How Do You Verify the Repair Is Complete?
A complete repair should include documented structural measurements, a final alignment printout, a full diagnostic scan, required ADAS calibration, water-seal testing, and a road test performed under safe conditions. The repair order should identify replaced parts, repaired panels, calibration procedures, and any remaining limitations.
Before accepting the vehicle, verify that:
- The trunk, doors, fuel door, and charging door latch normally.
- Panel gaps are even and weather stripping is seated.
- No warning lights remain after the vehicle completes its self-check.
- Blind-spot, rear cross-traffic, parking sensors, camera, and lights function.
- The steering wheel is centered and the vehicle tracks normally.
- The exhaust is secure and no fumes enter the cabin.
- The spare tire and tools fit correctly.
- The trunk remains dry after a controlled water test.
- The insurer receives photographs and any approved supplement.
A repair facility cannot guarantee that a vehicle will perform identically in a future collision. It can document that damaged components were repaired or replaced, structural dimensions meet specifications, and required systems function at delivery.
Frequently Asked Questions
Can a rear-end collision damage the transmission?
Yes, especially in rear-wheel-drive and all-wheel-drive vehicles, although transmission damage is less common than bumper, body, suspension, or exhaust damage. Inspect for fluid leaks, new vibration, drivetrain binding, delayed engagement, and impact-related movement at the driveshaft, differential, transfer case, or transmission mounts.
How long can I wait before inspecting a rear-ended car?
Arrange an inspection as soon as practical, preferably within 24-72 hours. Prompt documentation preserves evidence and identifies safety problems before rain, corrosion, battery discharge, or continued driving changes the condition. Do not wait if warning lights, leaks, tire rubbing, exhaust fumes, or unstable handling are present.
Will insurance pay for hidden collision damage?
Insurance generally evaluates damage related to the covered collision, subject to the policy, deductible, liability decision, and coverage limits. A teardown estimate, photographs, scan results, alignment report, and manufacturer measurements help connect hidden damage to the impact, but coverage decisions belong to the insurer.
Is a small dent always safe to drive?
No. Dent size does not reliably indicate impact energy or internal damage. A small cover mark can coexist with a bent reinforcement, displaced radar bracket, or damaged trunk structure, while a larger cosmetic dent may leave safety components intact. Use the safety triage criteria before driving.
Can I inspect the frame at home?
You can look for ripples, cracked seam sealer, displaced wheels, uneven gaps, and trunk-floor distortion at home. You cannot reliably determine structural alignment without a lift, manufacturer dimensions, and suitable measuring equipment. Home inspection is a screening step, not a structural certification.
Should I choose OEM or aftermarket bumper parts?
Choose based on structural specification, sensor compatibility, fit, warranty, and insurer approval rather than price alone. An aftermarket cosmetic cover may fit acceptably, but reinforcement bars, absorbers, radar brackets, and sensor components must meet the vehicle manufacturer’s requirements for the specific model.
The Bottom Line
How to identify hidden damage after a rear-end collision is a question of safety verification, not bumper appearance. Document the impact, inspect the trunk and underbody, check wheel geometry and new symptoms, scan every relevant module, and obtain teardown or frame measurement when structure, suspension, sensors, or high-voltage systems may be affected. A professional collision inspection is the only reliable way to confirm that hidden damage has been found and repaired.


