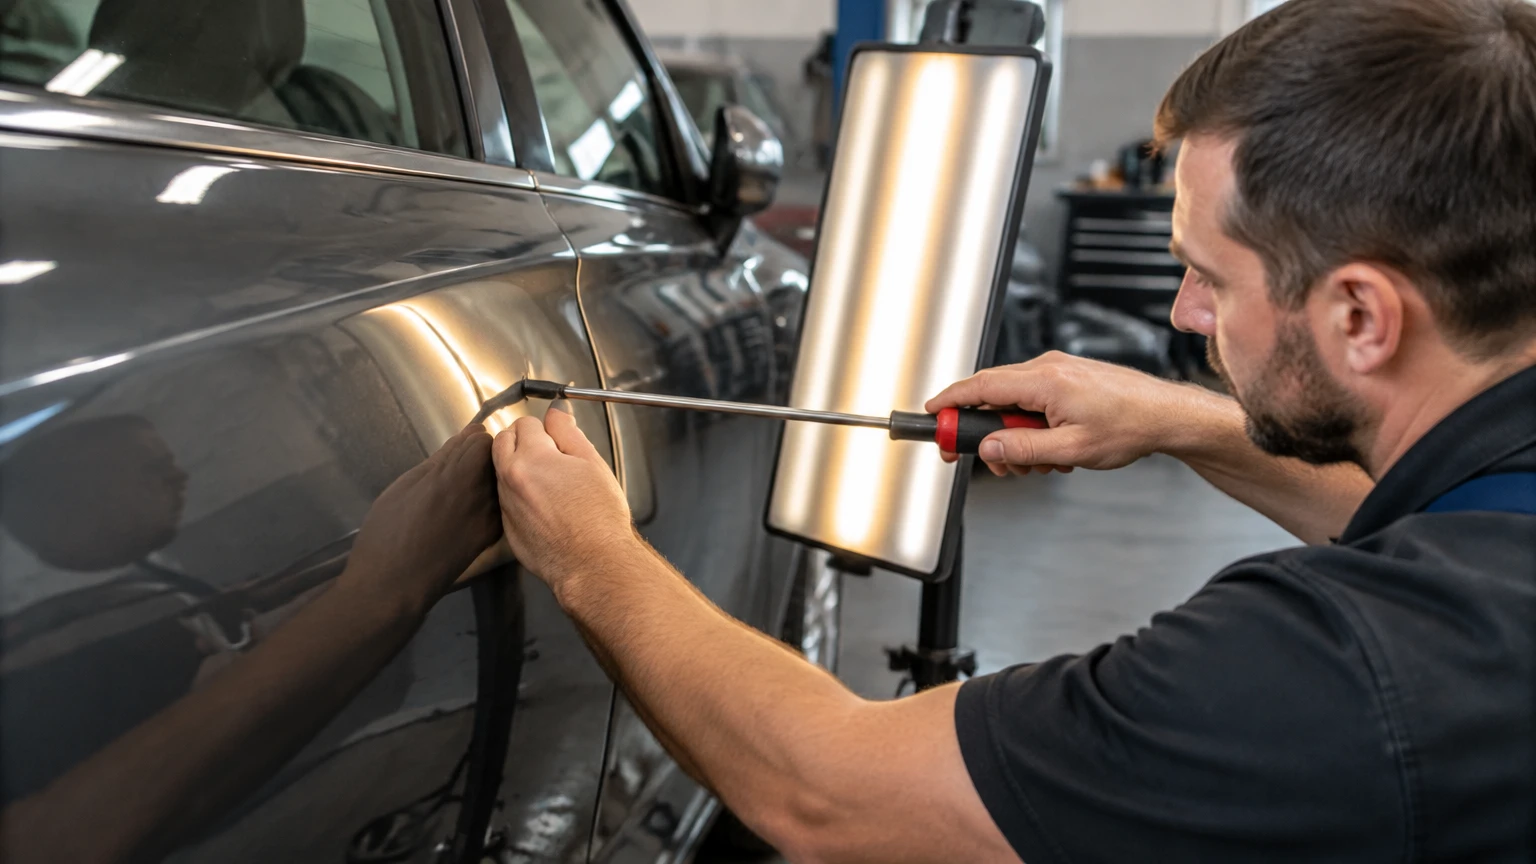
Paintless dent repair for hail damage restores shallow dents by carefully manipulating the original panel from behind, usually without filler, sanding, or repainting. A technician maps each impact with specialized lighting, gains access through factory openings or controlled disassembly, then pushes and blends the metal until the panel and factory finish return to an acceptable original shape.
Key Facts at a Glance
- Paintless dent repair works best when factory paint remains intact and the panel has not been severely stretched.
- Hail repair usually involves dozens of separate dents across the roof, hood, trunk, fenders, and doors.
- Technicians inspect distorted reflections under parallel LED light lines to locate dents that ordinary overhead lighting misses.
- Internal rods and whale-tail tools are the standard method; glue pulling is an access solution, not automatically a superior technique.
- Typical hail repair costs range from about $1,500 for light damage to more than $10,000 for severe multi-panel damage.
- A cracked finish, torn metal, sharp body-line crease, or structurally damaged panel may require conventional body repair or replacement.
What Is Paintless Dent Repair for Hail Damage?
Paintless dent repair, commonly called PDR, removes dents without changing the vehicle’s original painted surface. Hail PDR is a specialized high-volume application because a single storm can create many shallow impacts on horizontal panels, often with different depths, crowns, access challenges, and paint conditions.
The method does not literally make damaged metal remember its shape in every situation. Steel and aluminum deform elastically at first, but a force beyond the elastic range leaves permanent deformation and may stretch the panel. PDR succeeds when the technician can gradually release that deformation without creating a visible high spot, sharp crease, or paint failure.
Factory-applied paint is a major advantage. Original coatings are generally more evenly bonded and cured than many refinished surfaces, although age, prior repairs, corrosion, cold temperatures, and ultraviolet exposure can reduce flexibility. A professional inspection therefore evaluates both the dent and the coating before anyone promises a result.
Which Hail Dents Are Good Candidates?
Shallow, rounded dents with intact paint are the strongest PDR candidates. A small impact in the middle of a broad steel hood may be straightforward, while a similarly sized dent on a sharp character line can be difficult because the line controls the surrounding metal.
| Damage condition | Typical PDR suitability | Main technical concern |
|---|---|---|
| 5-20 shallow roof dents | High | Headliner access and dent mapping |
| 20-50 mixed hood dents | Moderate to high | Crowns, bracing, and aluminum sections |
| Deep dent with intact paint | Variable | Metal stretch and oil canning |
| Cracked or chipped paint | Low | Corrosion and clear-coat failure |
| Torn metal or open hole | None | Panel replacement or body repair |
| Damage on a sharp body line | Moderate | Line restoration and high spots |
How Does Paintless Dent Repair Work for Hail Damage?
Paintless dent repair for hail damage works by controlling the panel’s stress from the outside edge toward the deepest point, then refining the surface under specialized light. The technician applies many small, measured movements rather than one forceful push, because a large push can create a high spot, stretch the metal, or fracture the clear coat.
The process is closer to metal finishing than to pulling a dent outward. A technician reads the reflection pattern, identifies the dent’s perimeter and crown, selects an access tool, and works through a sequence that may include pushing, blending, tapping down, and repeated inspection. The best result depends more on pressure control and access than on raw tool strength.
Step 1: Inspect and Map Every Impact
The vehicle is cleaned and examined under a PDR LED light board or equivalent line light. Parallel reflections bend around each depression, allowing the technician to count dents, identify overlapping impacts, and distinguish hail damage from old door dings or previous repairs.
The inspection also checks paint chips, cracked clear coat, corrosion, body gaps, broken moldings, sunroof drains, glass, lamps, cameras, and trim. A complete photo record helps separate storm damage from pre-existing defects during an insurance inspection.
Checkpoint: Every repairable dent has a location, approximate size, access plan, and finish-risk assessment.
Common mistake: Counting only visible dents in direct sunlight and missing shallow damage revealed by line distortion.
Step 2: Remove Parts for Safe Access
Remove and install, or R&I, gives the technician room to work without damaging interior components. Roof repairs may require careful headliner lowering, pillar-trim handling, grab-handle removal, and protection of curtain-airbag areas; hood work may require insulation removal, while trunk work may require liner and lamp removal.
Disassembly varies by vehicle. A technician should not cut, drill, bend, or detach an airbag component as a shortcut. On vehicles with powered liftgates, cameras, wiring harnesses, or glass roofs, correct reassembly matters as much as dent removal.
Checkpoint: The technician can reach the panel with controlled tool movement and has protected trim, wiring, glass, and airbags.
Common mistake: Removing trim without documenting clips, fasteners, connector locations, or torque requirements.
Step 3: Select the Access Point and Tool
Factory holes, drain openings, brace gaps, and existing wiring channels are preferred entry points. Long steel rods, carbon rods, whale tails, and flexible wire tools are selected according to panel depth, reinforcement, and the direction of the dent.
A tool that reaches the dent is not necessarily the correct tool. The tip must contact the panel predictably, and the shaft must avoid transferring force into a brace, harness, glass panel, or interior trim.
Checkpoint: The tool contacts the intended metal rather than a brace or unsupported trim component.
Common mistake: Drilling a new hole when an existing access path or limited R&I would provide safer entry.
Step 4: Massage the Dent From the Inside
The technician places controlled pressure near the dent’s deepest point and progresses outward in small increments. Work usually moves through the crown and perimeter rather than forcing the center upward in a single motion.
The line board reveals the rate of movement. If the reflection becomes a narrow, sharp distortion, the technician has created a high spot or is pushing too aggressively. Experienced technicians alternate pressure points and frequently change viewing angles to keep the panel level.
Checkpoint: The line reflection straightens gradually without a raised point or new crease.
Common mistake: Using excessive leverage because the first visible movement appears too slow.
Step 5: Use Glue Pulling Where Rear Access Is Blocked
Glue pulling attaches a purpose-shaped plastic tab to the outside of the dent, then uses a mini-lifter or slide hammer to raise the low area. The technician cleans the surface, chooses a tab matching the dent, controls glue temperature and curing time, and pulls in short, measured movements.
Glue pulling is useful around roof rails, reinforced sections, pillars, and double-wall areas. It can also help establish access, but it is not risk-free. Pulling can lift a high spot, disturb weak aftermarket paint, or leave glue residue and surface marks if the tab, glue, or force is wrong.
Checkpoint: The low area rises without a sharp crown or coating separation.
Common mistake: Treating a stronger pull as a faster repair.
Step 6: Blend High Spots and Finish the Panel
A high spot is lowered with a plastic or metal knockdown and controlled hammer taps, followed by additional blending. Finishing work reduces the visible transition between repaired metal and untouched metal; it does not simply flatten the center of each dent.
Technicians inspect the panel repeatedly under different light angles. A surface can look acceptable outdoors yet show remaining distortion under a line board, particularly on dark paint or a broad roof panel.
Checkpoint: Reflected lines remain continuous across the repair area at multiple viewing angles.
Common mistake: Stopping when the dent is no longer obvious from one angle.
Step 7: Reassemble and Perform Quality Control
The shop reinstalls trim, insulation, lamps, liners, seals, and other removed components. Quality control should include exterior lighting, door and liftgate operation, water-sensitive areas, glass clearance, warning lights, and a check that cameras or sensors were not displaced.
A final inspection is also the time to identify unrelated pre-existing damage. The customer should receive photographs or a written repair record when the insurance claim includes many panels.
Checkpoint: The vehicle has no loose trim, warning light, water-entry concern, or newly distorted reflection.
Common mistake: Treating panel appearance as the only quality measure.
Which PDR Techniques Are Used on Hail Damage?
Internal pushing is the primary technique for accessible steel and aluminum panels. Glue pulling handles blocked access, while blending and controlled tapping finish stretched or raised areas. Induction heating is a specialist process for selected metal-finishing problems, not a default step for ordinary hail dents.
| Technique | Typical application | Benefit | Limitation |
|---|---|---|---|
| Internal rods | Hood, roof, trunk, fender | Precise pressure from behind | Requires safe rear access |
| Whale-tail tools | Braces and narrow openings | Reaches confined areas | Can mark metal if misused |
| Glue pulling | Roof rails, pillars, double walls | No rear access required | Can lift paint or create highs |
| Mini-lifter | Small controlled exterior pulls | Fine adjustment | Poor choice for broad stretched metal |
| Knockdown blending | Crowns and high spots | Refines surface level | Requires accurate light reading |
| Induction heating | Selected stretched metal | Localized thermal movement | Can damage paint or clear coat |
Aluminum panels deserve separate treatment. Aluminum has different work-hardening and springback behavior than steel, so repeated manipulation can harden the metal and reduce repairability. An EV may also contain high-voltage components, large castings, cameras, and specialized trim, making vehicle-specific procedures and technician training important.
How Long Does Hail PDR Take?
A typical hail PDR repair takes one to ten working days once the vehicle enters the technician’s bay, but severe storms, insurance supplements, parts delays, and shop queues can extend the calendar time substantially. Actual labor depends on dent count, panel material, access, damage depth, and whether trim or glass must be removed.
| Damage level | Typical dent pattern | Bay time | Typical customer price |
|---|---|---|---|
| Light | 5-20 shallow dents | 1-2 days | $1,500-$3,500 |
| Moderate | 21-50 mixed dents | 2-4 days | $3,500-$7,500 |
| Severe | 51 or more, deep or overlapping | 5-10+ days | $7,500-$15,000+ |
| Borderline total loss | Multiple panels, glass, trim, structure | 1-3 weeks | Often insurance valuation driven |
These are typical industry ranges, not a universal price schedule. A compact car with a few roof dents may cost less than the lower range, while a large SUV with aluminum panels, a panoramic roof, and extensive R&I may exceed the severe-damage range.
How Much Does Hail Damage PDR Cost?
Hail PDR commonly costs about $1,500-$15,000 or more for a vehicle, with the final estimate based on dent quantity, depth, panel location, metal type, access, paint condition, and required disassembly. Per-dent prices become less useful as damage increases because technicians price labor by panel, access, and overall repair complexity.
| Pricing factor | Typical effect | Example consequence |
|---|---|---|
| Dent count | Raises labor hours | 40 roof dents cost more than 10 |
| Aluminum panel | Raises skill and time | Hood may require aluminum-trained technician |
| Headliner R&I | Adds labor | Roof repair takes longer than exposed hood work |
| Paint damage | Changes repair method | Cracked clear coat may require refinishing |
| Insurance deductible | Sets customer share | $1,000 deductible leaves that amount payable |
| Parts availability | Delays completion | Backordered molding can hold final delivery |
Insurance estimates may use estimating software, panel rates, labor categories, supplements, and depreciation rules. The first estimate can change after the technician exposes hidden damage or confirms that trim, glass, lamps, or sensors require replacement.
A vehicle can become a total loss when the projected repair cost plus salvage economics exceeds the insurer’s actual cash value threshold. The threshold differs by jurisdiction and carrier, so a severe hail estimate does not automatically mean the vehicle will be totaled.
Is PDR Better Than Traditional Body Repair?
PDR is usually better for intact paint and shallow hail dents because it preserves the factory finish and avoids filler and refinishing. Conventional body repair is better for torn metal, cracked paint, severe stretching, corrosion, structural damage, or a panel that cannot be restored economically.
| Decision factor | Paintless dent repair | Conventional body repair |
|---|---|---|
| Original paint | Usually retained | Sanded, primed, and refinished |
| Hail dent quantity | Efficient for many shallow dents | Labor increases with every repair area |
| Cracked coating | Limited suitability | Can refinish the affected panel |
| Torn metal | Not repairable by PDR | Can weld, replace, or reshape |
| Corrosion | Does not remove corrosion | Can treat and refinish corrosion |
| Completion time | Often 1-10 bay days | Often longer with curing and parts |
| Resale presentation | Preserves factory finish | Refinish quality varies by shop |
| Cost control | Often lower for cosmetic dents | Necessary for severe damage |
Claims about automatic CARFAX outcomes require caution. Reporting practices vary by insurer, repairer, jurisdiction, and data provider, so customers should not assume PDR will never appear in a vehicle history report. A written invoice describing non-structural cosmetic repair provides better documentation than a verbal promise.
Can You Repair Hail Damage With a DIY Kit?
DIY suction cups and generic glue kits are poor choices for multi-panel hail damage because they lack the lighting, access tools, pressure control, and metal-finishing judgment required for consistent results. A small isolated dent may be a learning project, but a hail field can contain dozens of different damage patterns that magnify every mistake.
Common DIY failures include:
- Pulling a low area above the surrounding surface.
- Cracking old, cold, or previously refinished clear coat.
- Leaving adhesive residue or a circular glue-pull mark.
- Pushing against a brace and denting the brace or outer skin.
- Removing trim incorrectly and breaking clips or airbag retainers.
- Missing dents that remain visible under professional inspection lighting.
A DIY kit cannot determine whether metal is stretched, paint is already compromised, or an apparent dent sits over a sensor, reinforcement, or bonded joint. The cheapest safe option is often a documented inspection before attempting any repair.
What Problems Can Make Hail PDR Fail?
PDR can fail when hail stretches the metal beyond practical recovery, breaks the coating, damages a body line, or leaves access too restricted for controlled pressure. A visible “oil can” effect, where the panel pops between concave and convex positions, indicates residual tension that ordinary pushing may not solve cleanly.
| Failure condition | What the technician observes | Likely response |
|---|---|---|
| Oil canning | Panel pops under light pressure | Localized shrinking or body repair |
| Paint fracture | Clear coat or color coat cracks | Refinish or replace affected panel |
| Severe crown | Tight raised ring around dent | Blend and controlled knockdown |
| Sharp crease | Narrow permanent fold | PDR assessment, possible conventional repair |
| Previous filler | Brittle or uneven repaired area | Test coating before manipulation |
| Blocked access | Brace prevents tool placement | Glue pulling or panel removal |
| Corrosion | Rust beneath or around impact | Corrosion repair before finish work |
Cold conditions can reduce coating flexibility, but there is no universal safe temperature that guarantees paint will survive manipulation. A competent shop controls working conditions, evaluates the coating, and avoids treating a generic heat setting as a substitute for judgment.
How Should You Handle Insurance After a Hailstorm?
Hail damage normally falls under comprehensive auto insurance rather than collision coverage, subject to the policy deductible and exclusions. Contact the insurer promptly, photograph the vehicle before washing away evidence, ask how the carrier handles supplements, and obtain an independent PDR inspection before authorizing repairs.
The statement that hail claims never raise premiums is too broad. A single comprehensive claim may be treated differently from an at-fault collision, but insurers can consider claim frequency, regional catastrophe losses, underwriting rules, and state regulation when pricing future coverage.
Use this sequence:
- Photograph the entire vehicle, glass, lamps, trim, and interior water evidence.
- Record the storm date and location if known.
- File the claim within the policy’s reporting requirements.
- Ask whether the insurer permits your choice of repairer.
- Confirm the deductible, rental coverage, supplements, and payment process.
- Compare the adjuster’s estimate with a specialist’s panel-by-panel assessment.
- Avoid signing an assignment or authorization you do not understand.
- Keep invoices, photographs, warranty terms, and replaced-part records.
A reputable shop should provide a physical business address, verifiable registration, written warranty terms, itemized scope, and a clear explanation of who receives insurance funds. A temporary storm operation is not automatically dishonest, but an untraceable operator with no written warranty creates avoidable risk.
Should You Choose PDR for a Lease or EV?
Lease drivers should repair hail damage before the return inspection when the cost of repair is lower than expected excess-wear charges or when the lease agreement requires restoration. EV owners should select a technician who can document experience with the vehicle’s aluminum panels, trim, cameras, glass roof, and manufacturer-specific safety procedures.
| Situation | Main decision | Practical check |
|---|---|---|
| Lease return in 30 days | Repair before inspection | Request pre-return condition assessment |
| Tesla or aluminum EV | Verify aluminum experience | Ask for comparable completed repairs |
| Panoramic roof | Confirm headliner and glass process | Check leak and trim warranty |
| ADAS-equipped vehicle | Protect cameras and sensors | Confirm post-repair calibration procedure |
| Older car with brittle paint | Test coating condition | Inspect for previous refinishing and cracks |
| High deductible | Compare repair economics | Get written cash and insurance estimates |
PDR does not repair structural damage, replace broken glass, or recalibrate a displaced camera. If a shop removes or disturbs ADAS components, ask whether scanning, aiming, or calibration is required under the vehicle manufacturer’s procedure.
How Do You Choose a Qualified Hail Repair Shop?
Choose the shop that can explain the repair plan panel by panel, show a traceable operating location, document insurance communication, and state the limits of its warranty. Technician credentials can help, but photographs of comparable hail repairs and transparent inspection findings are more useful than a badge alone.
Ask these questions before authorizing work:
- How many hail vehicles has the shop repaired this season?
- Which panels are steel, aluminum, or composite?
- Will the shop remove the headliner, lamps, liners, or trim?
- How will it protect curtain airbags, wiring, glass, and cameras?
- What happens if paint cracks during a documented repair?
- Is the warranty written, transferable, and limited by prior damage?
- Does the estimate include supplements and hidden damage?
- Who handles the deductible and insurance payment?
- Will the shop provide pre-repair and post-repair photographs?
- What inspection lighting will be used at delivery?
A lifetime warranty is not meaningful if it excludes paint failure, prior damage, aluminum work, or every condition likely to occur. Read the exclusions.
The Bottom Line
Paintless dent repair for hail damage works by mapping each impact, accessing the panel safely, and restoring the metal through controlled pressure, glue pulling, blending, and repeated light-board inspection. PDR is usually the best finish-preserving option for shallow dents with intact factory paint, while conventional repair becomes more appropriate when metal is torn, paint is broken, corrosion is present, or the panel is structurally compromised.
The decisive questions are not simply how many dents the vehicle has. They are whether the metal remains repairable, whether the coating can tolerate movement, whether the technician can reach the damage without collateral damage, and whether the total cost makes economic sense relative to the vehicle’s value and insurance deductible.
Frequently Asked Questions
Does hail damage always require paintless dent repair?
No. Paintless dent repair is appropriate only when the panel and coating remain sufficiently intact. Cracked paint, torn metal, corrosion, severe oil canning, structural deformation, and inaccessible damage can require conventional body repair, panel replacement, or a combined repair strategy.
Will PDR remove every visible sign of hail damage?
A skilled technician can often restore shallow hail dents to a highly inconspicuous condition, but a guaranteed invisible result is not realistic for every panel. Deep impacts, sharp crowns, body-line damage, prior filler, thin aluminum, and damaged paint can leave limitations that should appear in the written estimate.
Can hail damage be repaired without filing an insurance claim?
Yes. An owner can pay privately if the estimate is manageable, the deductible is high, or the owner wants to avoid a claim record. Compare a written cash estimate with the policy deductible, coverage terms, possible supplements, and the vehicle’s actual value before deciding.
Does PDR reduce a vehicle’s resale value?
PDR generally preserves more original factory finish than filler and repainting, which can benefit presentation and resale confidence. However, repair history reporting varies, and a buyer may still identify prior hail damage through records, paint measurement, trim evidence, or an inspection.
How soon after a hailstorm should a vehicle be inspected?
Arrange inspection as soon as practical, preferably before unrelated weather, washing, corrosion, or a second storm changes the evidence. Early inspection also helps document the storm’s damage accurately and gives the owner more time to compare shops, deductibles, repair methods, and total-loss options.


