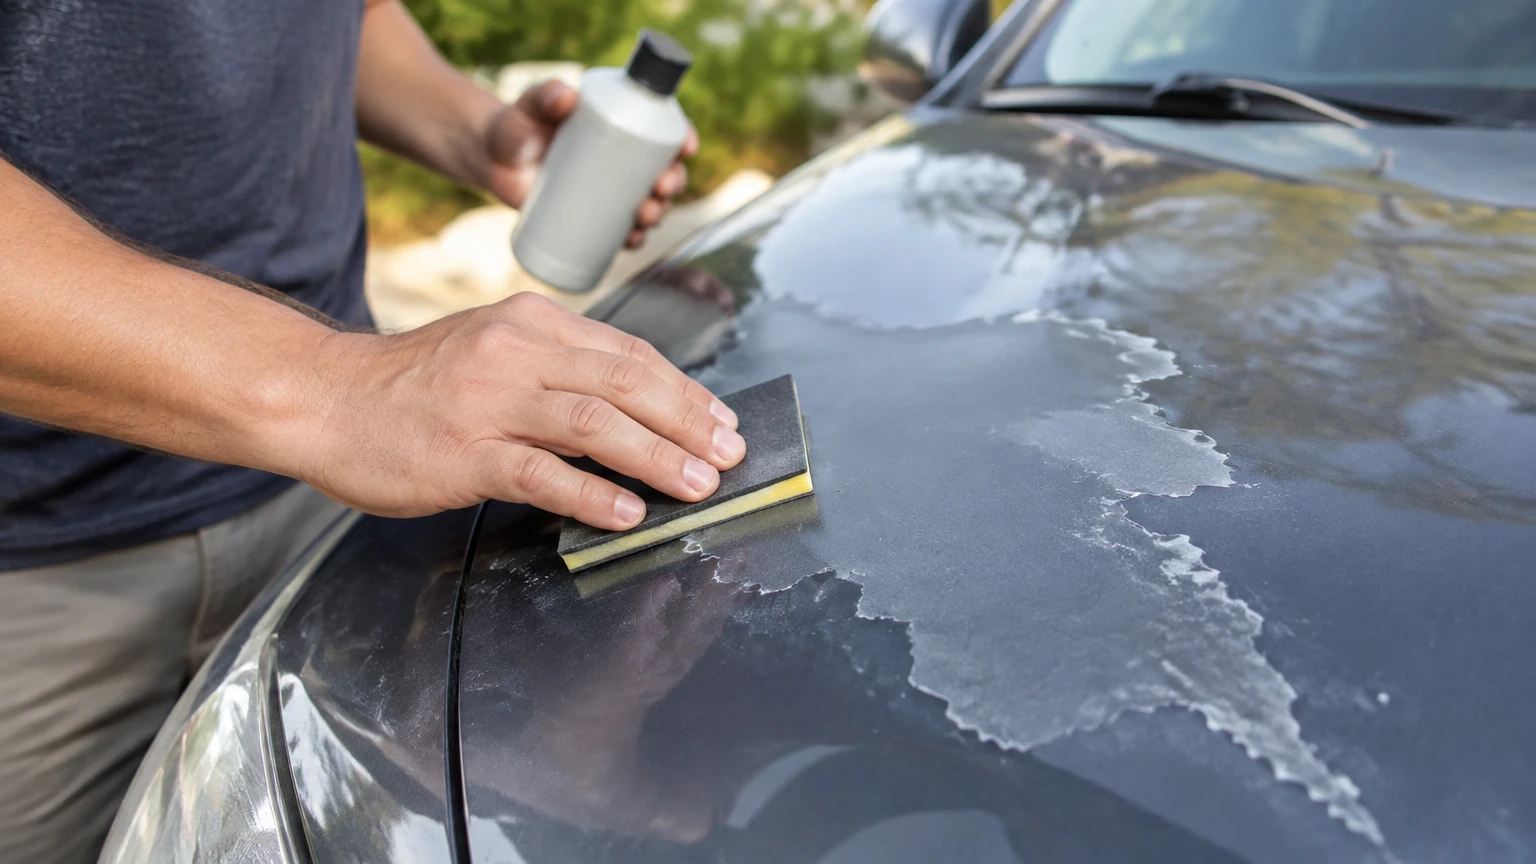
To fix peeling clear coat on a car, remove every loose layer, feather the remaining edge, restore any damaged base color, and apply compatible automotive clear coat. A small, stable repair can take 4-8 hours of active work plus 24-48 hours of curing, but widespread delamination usually requires refinishing the entire panel.
Key facts at a glance
Peeling clear coat cannot be repaired by polishing because polishing removes material rather than restoring adhesion.
A fingernail that catches under a spreading edge indicates unstable adhesion beyond the visible damage.
Spot repair is most appropriate when the damage is localized, the base color remains intact, and the surrounding clear coat is firmly bonded.
A 2K polyurethane clear coat generally provides better chemical and UV resistance than a 1K aerosol, but it requires strict respiratory and skin protection.
Bare metal needs corrosion protection before color and clear coat; clear coat alone will not prevent rust.
Professional refinishing commonly costs more than DIY because the shop must control blending, dust, color matching, and warranty risk.
Can Peeling Clear Coat Be Repaired?
Peeling clear coat can be repaired when the damaged area is localized and the surrounding finish remains firmly attached. The repair involves cleaning, removing loose clear coat, sanding a gradual edge, applying base coat where necessary, spraying new clear coat, and leveling the cured finish.
A repair is less predictable when peeling extends across a hood, roof, trunk, or complete side panel. Factory paint systems can lose adhesion in multiple invisible areas after prolonged ultraviolet exposure, so a small patch may look correct initially while adjacent clear coat begins lifting weeks later.
The visible white, cloudy, or transparent film is usually delaminated polyurethane clear coat. The layer beneath may be colored base coat, primer, e-coat, or bare metal. Correct diagnosis determines whether the job needs only clear coat, color and clear, or full substrate preparation.
When should you repair the whole panel?
Refinish the whole panel when the peeling area exceeds roughly 25-30% of its surface, when several separate edges are lifting, or when light pressure causes additional flaking. These are practical shop thresholds rather than universal standards, because paint history and panel shape affect the decision.
A professional may also recommend full-panel repair on a metallic or pearl finish. Spot blending can leave a visible color transition because metallic orientation changes with spray distance, pressure, overlap, and reducer temperature.
What You Need Before Starting
A typical DIY spot repair costs $60-$150 and requires one to two days of elapsed time. The work is suitable for a controlled garage or outdoor enclosure, but aerosol automotive coatings need ventilation, stable temperature, and protection from dust.
Before-you-start checklist
| Requirement | Typical specification | Why it matters |
|---|---|---|
| Ambient temperature | 18-27°C, or 65-80°F | Supports predictable flash and flow |
| Relative humidity | Preferably below 70% | Reduces blushing and slow solvent release |
| Active work time | 4-8 hours | Includes sanding, masking, and spraying |
| Initial cure | 24-48 hours | Allows careful inspection and light finishing |
| Full chemical cure | Often 5-30 days | Depends on product chemistry and conditions |
| DIY material cost | $60-$150 | Covers abrasives, solvent, color, and clear |
| Professional panel repair | Commonly $400-$1,500 | Varies by location, panel, and paint system |
Tools and materials
Use a sanding block rather than folding sandpaper in your hand. A block keeps pressure distributed and reduces low spots that become visible after clear coat.
You will typically need automotive shampoo, wax and grease remover, lint-free wipes, masking tape, masking paper or plastic, a spray bottle, sanding blocks, wet-or-dry abrasive paper, tack cloth, color-matched base coat, compatible clear coat, nitrile gloves, eye protection, and a properly selected respirator.
For 2K polyurethane products, read the safety data sheet before spraying. Many 2K coatings contain isocyanate hazards that ordinary dust masks do not filter. A cartridge respirator is not automatically adequate for every product or workplace; supplied-air protection and professional application may be required.
Step 1: Diagnose the Paint Layers
Identify the lowest exposed layer before sanding. A glossy colored surface usually indicates intact or scuffed base coat, a dull gray or beige surface often indicates primer, and shiny silver or orange-brown exposure can indicate metal or corrosion.
Wash the panel with automotive shampoo, rinse thoroughly, and dry it. Do not use aggressive household degreasers repeatedly on older paint because they can leave residues or soften sensitive finishes.
Run a clean fingernail across the peeling boundary. If the nail catches but the surrounding film remains stable, the edge may be feathered. If large flakes detach with little force, continue testing around the perimeter because the visible boundary may not represent the true failure zone.
Success checkpoint: the repair boundary is mapped with a removable marker or masking tape, and you know whether color coat, primer, or metal is exposed.
Common mistake: sanding immediately without checking adhesion. Removing only the visible flap leaves unstable clear coat beneath the new coating.
Step 2: Wash, Degrease, and Mask
Wash the panel, dry it completely, and wipe the repair zone with a compatible wax and grease remover. Apply the solvent to a cloth rather than flooding the panel, then use a second clean cloth to lift contamination before the solvent evaporates.
Mask body gaps, handles, lamps, glass, trim, wheels, and adjacent panels. Leave enough surrounding area for sanding and blending, but do not expose half the vehicle unnecessarily. A typical spot repair needs 30-60 cm of preparation beyond the visible defect, depending on the blend design.
Avoid touching the prepared surface with bare hands. Skin oil can cause craters, fisheyes, and adhesion loss.
Success checkpoint: the surface dries uniformly without oily streaks, and masking edges are firmly sealed.
Common mistake: using silicone-containing polish or household glass cleaner before painting. Silicone contamination can survive casual cleaning and produce fisheyes in fresh clear coat.
Step 3: Remove Loose Clear Coat
Use a plastic scraper only to lift already-separated material, never to pry bonded paint from the panel. Sand the peeling shelf with 600-800 grit on a block until the loose edge disappears and the transition feels continuous.
Wet sanding controls dust and reduces abrasive loading, but water can enter seams, trim gaps, and exposed metal. Dry sanding can be preferable around corrosion or electrical components if dust extraction is controlled. Follow the abrasive and coating manufacturer’s instructions.
Do not stop when the repair looks smooth while wet. Run a fingertip across the surface after drying it, because water can hide a shallow ridge.
Success checkpoint: a clean, stable perimeter remains, with no chips that move under light fingernail pressure.
Common mistake: sanding only the center of the defect. The failure usually continues under the intact-looking edge.
Step 4: Feather the Edge and Prepare the Blend Zone
Feather the edge by widening the sanding pattern through progressively finer abrasives. A practical sequence is 800 grit to level the edge, 1000-1200 grit to smooth the transition, and 1500-2000 grit to prepare intact surrounding clear coat for adhesion.
Use a firm block on broad flat areas and a flexible interface pad on curved panels. Keep the sanding pattern controlled and inspect from several angles under reflected light. A ridge that cannot be felt may still be visible after gloss returns.
Factory clear coat thickness varies by vehicle, panel, and paint process. Typical total paint-film thickness may fall around 90-150 microns, but the clear portion is not always 38-50 microns, and a fixed “safe sanding allowance” cannot be guaranteed without a paint-thickness gauge and layer knowledge.
Success checkpoint: the fingernail glides across the transition without catching, and the surrounding surface has a uniform dull sheen.
Common mistake: sanding through the color coat while chasing a perfect invisible edge. Stop and reassess if the substrate color changes or the primer appears.
Sanding grits and their jobs
| Abrasive | Typical use | Surface condition |
|---|---|---|
| 400-600 grit | Removing severe failure or corrosion | Deep scratches requiring refinement |
| 600-800 grit | Leveling loose clear coat | Visible but controlled sanding marks |
| 1000-1200 grit | Refining a feathered edge | Smooth transition around the defect |
| 1500-2000 grit | Preparing intact clear for recoat | Uniform matte surface |
| 2500-3000 grit | Leveling cured overspray or texture | Fine finish before compound |
Step 5: Decide Whether Base Color Is Necessary
Apply base coat only where the original color is missing, heavily sanded, oxidized, or visibly mismatched. If the original color remains intact and the preparation has only dulled the clear coat, spraying unnecessary color can create a shade difference and a visible blend edge.
Test the color on a hidden or disposable panel when possible. Solid black is comparatively forgiving, while metallic silver, pearl white, red, and three-stage colors require careful spray technique and sometimes a professional blend.
Substrate diagnosis
| Exposed layer | Required preparation | Required coating |
|---|---|---|
| Intact color coat | Scuff with 1000-1500 grit | Clear coat after cleaning |
| Sanded color coat | Clean and seal if required | Matched base coat, then clear |
| Factory primer | Refine scratches and seal | Base coat, then clear |
| Bare steel | Remove oxidation and prime | Epoxy or compatible primer, base, clear |
| Bare aluminum | Use compatible metal preparation | Aluminum primer, base, clear |
| Bare plastic | Clean and abrade carefully | Plastic adhesion promoter, base, clear |
If bare metal is exposed, do not leave it overnight in humid air. Flash rust can develop quickly, especially on steel panels. Apply the correct primer according to the coating system rather than burying the metal under clear coat.
Success checkpoint: the base color covers the substrate evenly without dry patches, mottling, or a visible hard stop.
Common mistake: applying thick color coats to hide sanding marks. Thick base coat can trap solvent and cause wrinkling or later shrinkage.
Step 6: Spray the New Clear Coat
Use a clear coat compatible with the base coat, temperature, and application method. A 2K aerosol contains a separate activator and generally cures harder than a 1K product, but activated 2K cans have a limited pot life, commonly around 12-48 hours according to product formulation.
Shake and activate the product exactly as its label specifies. Spray the first coat as a medium coat, followed by one or two wetter coats after the stated flash period, commonly 10-15 minutes at approximately 21°C. Hold the nozzle about 15-20 cm, or 6-8 inches, from the surface and overlap passes by roughly 50%.
Do not chase a wet appearance by flooding the panel. Runs, solvent pop, and trapped solvent are harder to correct than mild orange peel.
Success checkpoint: each coat has even gloss and no curtains, craters, dry spray, or solvent bubbling.
Common mistake: extending the flash time indefinitely because the surface still looks glossy. Flash is determined by product, temperature, airflow, and coat thickness, not gloss alone.
1K versus 2K clear coat
| Attribute | 1K aerosol clear | 2K aerosol clear | Spray-gun 2K clear |
|---|---|---|---|
| Hardener | None in the can | Internal activator | Mixed separately |
| Typical pot life | Not applicable after opening | 12-48 hours after activation | Product-specific, often 30-90 minutes |
| Chemical resistance | Low to moderate | Moderate to high | High when correctly mixed |
| Equipment cost | $10-$25 | $20-$40 | Gun, compressor, and PPE required |
| Best use | Temporary or low-exposure repair | Small durable DIY repair | Full-panel professional refinishing |
| Main limitation | Softness and UV aging | Isocyanate exposure and waste | Overspray, setup, and mixing accuracy |
A 1K product is not automatically useless. It can be appropriate for a temporary cosmetic repair, a low-value vehicle, or a small area where the owner accepts shorter durability. A 2K product is not automatically safe or professional-grade when sprayed without suitable respiratory protection.
Step 7: Cure, Inspect, and Polish
Allow the repair to cure according to the clear-coat technical data sheet. Typical initial cure is 24-48 hours at room temperature, while polishing may be permitted after 24-72 hours. Avoid wax, sealant, or ceramic coating until the manufacturer’s full-cure window has passed, which may range from several days to 30 days.
Inspect the surface in direct and angled light. Small dust nibs or orange peel can be wet-sanded with 2000-3000 grit on a soft block, followed by a cutting compound and finishing polish. Do not polish a soft or solvent-rich film because the pad can pull, smear, or imprint the coating.
Success checkpoint: the surface is hard enough to sand without clogging the paper, and the blend edge disappears under both diffuse and direct light.
Common mistake: polishing too early. A glossy surface can still contain solvent and remain mechanically weak.
What Changes for a Plastic Bumper?
Plastic bumper repair requires a plastic-safe cleaning process, careful abrasion, and adhesion promoter on exposed bare plastic. A bumper cover flexes during impacts and temperature changes, so coatings must be compatible with that movement.
Remove silicone, tar, and road film without using a solvent that attacks the plastic. Sand exposed plastic with the abrasive range recommended by the coating supplier, then apply plastic adhesion promoter only where required. Some modern refinishing systems do not require a separate flex additive because the clear formulation already provides the necessary flexibility.
Do not add a flex additive by habit. Excess additive can change gloss, hardness, drying behavior, or recoat compatibility. The product technical data sheet controls.
When Is Professional Refinishing the Better Choice?
Professional refinishing is usually the better choice when peeling covers most of a panel, corrosion is present, the vehicle uses pearl or three-stage paint, or the repair borders a sharp body contour. A body shop can measure film thickness, control spray conditions, blend adjacent color, and bake or cure the coating under controlled conditions.
DIY repair makes more sense for a small roof edge, mirror cap, or isolated panel area when appearance expectations are moderate. A shop may decline a tiny spot repair because the surrounding factory finish is already failing and cannot be warranted.
Typical repair-scope comparison
| Repair scope | DIY material cost | Active labor | Likely result |
|---|---|---|---|
| Coin-sized stable defect | $40-$80 | 2-4 hours | Acceptable at normal viewing distance |
| Hand-sized defect | $60-$150 | 4-8 hours | Good if color blending is controlled |
| Half-panel delamination | $100-$250 | 8-14 hours | High risk without spray equipment |
| Full hood or roof | $150-$350 | 12-20 hours | Better handled by a refinisher |
| Professional single panel | Not applicable | 1-3 business days | Usually more consistent and warrantable |
These are typical ranges, not guaranteed prices. Regional labor rates, paint code complexity, disassembly, corrosion, and whether the shop blends adjacent panels can change the estimate substantially.
Common Mistakes and How to Fix Them
| Symptom | Likely cause | Corrective action |
|---|---|---|
| White ring at the edge | Ridge remained under the new coating | Cure, sand the ridge flat, and recoat |
| Orange peel | Dry spray, excessive distance, or incorrect temperature | Cure fully, level with 2000-3000 grit, then compound |
| Fisheyes or craters | Wax, silicone, oil, or compressor contamination | Stop, cure, sand flat, clean again, and restart |
| Runs or curtains | Excessive wet film or slow overlap | Cure before sanding; do not wipe wet paint |
| Blushing or milky clear | Humidity, cold panel, or trapped solvent | Improve conditions and follow the product recoat window |
| New peeling at old boundary | Unstable clear remained underneath | Strip back to stable material and enlarge the repair |
A new coating cannot create adhesion to a surface that is already delaminating. This is the most important failure principle in clear-coat repair.
One practitioner rule is to inspect the repair after it has been washed several times, not only immediately after polishing. Water, heat, and detergent reveal weak edges that a fresh gloss can temporarily conceal.
Can You Temporarily Protect Peeling Paint?
Temporary protection can slow contamination and ultraviolet exposure, but it cannot stop delamination. Keep the vehicle washed with automotive shampoo, avoid pressure-washing directly at the lifted edge, and park under cover when practical.
Clear tape, household varnish, and nail polish are poor repairs. They can trap moisture, shrink unevenly, discolor under UV exposure, and complicate later refinishing. A clean, dry temporary surface is usually easier for a shop to repair than one covered with incompatible household products.
FAQ
Can polishing remove peeling clear coat?
Polishing cannot restore peeling clear coat because compounds abrade and refine a bonded surface; they do not chemically reconnect a detached film. Polishing a damaged edge can catch the loose layer and enlarge the failure. Use polishing only after new clear coat has cured and the surface needs texture correction.
How long will a DIY clear-coat repair last?
A DIY repair may last several years when the surrounding paint is stable, the substrate is correctly prepared, and the coating is applied within its temperature and recoat limits. It may fail within months when hidden delamination, poor cleaning, excessive film thickness, or incompatible products remain under the repair.
Can I spray clear coat over faded paint?
Spraying clear coat over faded paint can improve gloss temporarily, but it does not restore missing pigment or correct chalked, oxidized base coat. Sanding that exposes or removes the color requires compatible base coat before clear. Test a small area first because oxidation can indicate deeper paint-system failure.
Should I repair a peeling hood before selling the car?
Repairing a peeling hood can improve presentation, but disclose the repair if asked and avoid a rushed spot job that creates a visible mismatch. A buyer or inspection service may notice overspray, color variation, or continued delamination. A professional estimate can help determine whether repair cost is recoverable in the sale price.
Why does clear coat peel more often on roofs and hoods?
Roofs and hoods receive intense ultraviolet exposure and heat cycling, which accelerate degradation of the clear-coat binder and its interface with the base coat. Horizontal panels also collect contamination and receive direct sunlight for longer periods, so they commonly fail before shaded vertical doors.
The Bottom Line
How to Fix Peeling Clear Coat on a Car depends on the size and stability of the failure. Clean the panel, test adhesion, remove every loose layer, feather the edge, restore color or primer where necessary, and apply compatible clear coat under controlled conditions. Use spot repair only for stable localized damage; choose full-panel refinishing when peeling is widespread, the substrate is exposed, or the finish is a difficult metallic or pearl color.


