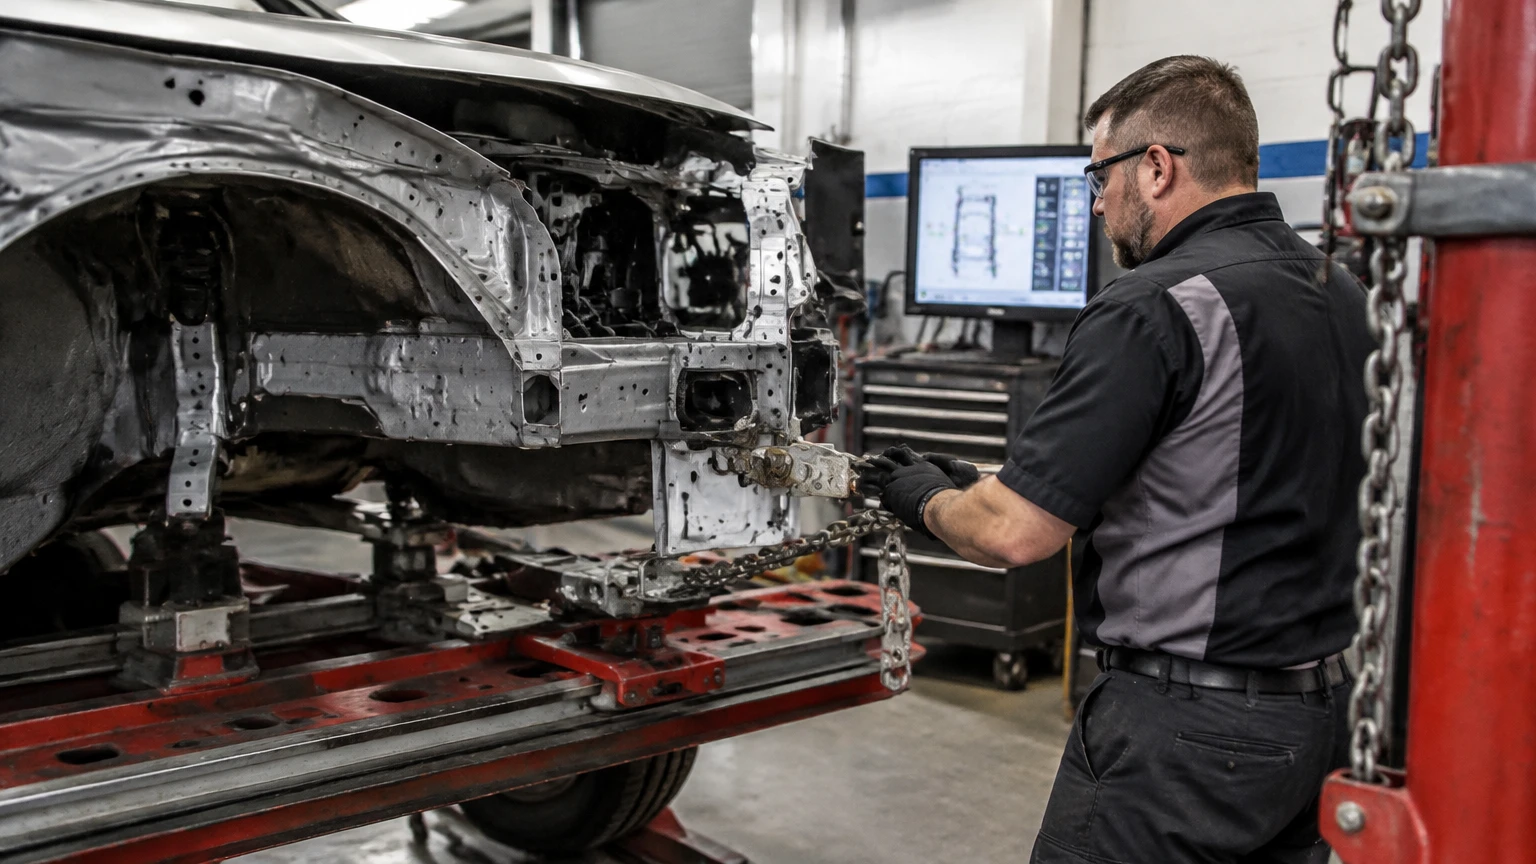
Frame testing diagnoses whether a vehicle’s structural dimensions remain within manufacturer specifications; frame straightening corrects measurable deformation by applying controlled force to the structure. Testing uses reference points, gauges, lasers, or computerized measuring systems without intentionally stressing the metal, while straightening uses anchoring equipment, chains, and hydraulic towers to restore alignment when OEM repair procedures permit it.
Key Facts at a Glance
- Frame testing measures structural deviation; frame straightening changes the structure’s position.
- A vehicle can need frame testing without needing frame straightening.
- A wheel alignment cannot prove that a damaged unibody or chassis is dimensionally correct.
- A final measurement report should verify repairs against current OEM specifications.
- Straightening is not automatically safe for every ultra-high-strength steel component.
- Typical frame testing costs about $150-$500, while structural repair can range from $600 to more than $10,000.
What Does Frame Testing Measure?
Frame testing measures the three-dimensional position of structural reference points against the vehicle manufacturer’s specifications. Technicians may use a computerized measuring arm, laser system, tram gauge, measuring bench, or frame rack, depending on the vehicle and the repair facility.
The measured coordinates normally include length, width, height, and diagonal relationships. A collision can move one rail rearward, push a strut tower sideways, lower a suspension pickup point, or twist the structure without producing obvious exterior damage. A dimensional report identifies those changes.
Frame testing is diagnostic, not corrective. The equipment records the vehicle’s condition and may show that the structure is within tolerance, outside tolerance, or missing a required measurement because a component remains inaccessible.
What happens during a frame test?
A complete structural measurement commonly follows this sequence:
- Inspect the collision area. The technician reviews impact direction, visible damage, suspension position, gaps, and the vehicle’s repair history.
- Expose reference points. Bumpers, trim, inner panels, or damaged components may need removal.
- Mount and level the vehicle. The vehicle is positioned on a measuring bench or frame rack.
- Attach measuring equipment. Probes, targets, lasers, or mechanical gauges locate factory reference points.
- Compare dimensions. Software or printed charts compare measured X, Y, and Z coordinates with OEM data.
- Document deviations. The report identifies the location, direction, and amount of each variance.
- Plan the repair. The technician decides whether the remedy is adjustment, straightening, component replacement, or additional teardown.
A reported 1-millimeter deviation is not automatically a safety failure. The acceptable range depends on the reference point, vehicle design, OEM tolerance, and whether the dimension is structural or cosmetic. The repair decision must follow the vehicle manufacturer’s procedure rather than a universal number.
Is frame testing the same as a wheel alignment?
Frame testing and wheel alignment are different services. Wheel alignment measures and adjusts wheel angles such as toe, camber, and caster, while frame testing measures the position of structural and suspension mounting points relative to the vehicle’s reference system.
A vehicle can show acceptable toe after an impact while a rear rail, apron, or suspension pickup point remains displaced. Conversely, a vehicle can fail an alignment because of a bent control arm or worn bushing while the main structure remains dimensionally correct.
| Service | Primary measurement | Typical equipment | What the result proves |
|---|---|---|---|
| Frame testing | Structural X, Y, Z coordinates | Laser system, measuring arm, tram gauge | Whether reference points match OEM dimensions |
| Wheel alignment | Toe, camber, caster, thrust angle | Alignment rack and targets | Whether wheel angles meet alignment specifications |
| Suspension inspection | Component condition and movement | Lift, gauges, visual inspection | Whether arms, knuckles, joints, or struts are damaged |
| ADAS scan | Electronic faults and sensor status | Scan tool, calibration frame | Whether systems report faults or require calibration |
What Does Frame Straightening Do?
Frame straightening restores a deformed vehicle structure toward the manufacturer’s specified dimensions through controlled mechanical force. The vehicle is secured to a frame machine, and hydraulic towers, chains, clamps, or pushing attachments apply force in a calculated direction while technicians monitor movement.
Straightening may correct a rail that shifted rearward, a side member that moved laterally, or a section that buckled during a collision. The process is not cosmetic panel pulling. It concerns structural geometry and must account for metal type, crush behavior, weld locations, and the vehicle’s repair instructions.
A straightening operation normally begins only after measurement has identified the deformation. Pulling by appearance alone can move one point into position while creating a new distortion elsewhere.
How does the straightening process work?
- Secure the vehicle. Pinch-weld clamps or approved fixtures anchor the vehicle to the rack.
- Select the pulling vector. The technician positions the tower and chain opposite the measured displacement.
- Apply incremental force. Hydraulic pressure moves the structure gradually rather than through one uncontrolled pull.
- Monitor reference points. Live measurement or repeated checks track progress in length, width, height, and diagonals.
- Inspect the metal. Cracks, buckling, torn seams, and damaged welds determine whether pulling can continue.
- Replace non-repairable sections. OEM-approved sectioning or component replacement may be required.
- Release and remeasure. The final report confirms whether the structure reaches specified tolerances.
- Complete related repairs. Alignment, scanning, calibration, and road testing follow structural work.
The technician should not assume that reaching a visual target means the repair is complete. The final dimensions, weld quality, corrosion protection, fastener replacement, and electronic-system checks all affect the repair outcome.
Does straightening always restore the original strength?
Frame straightening restores geometry, but geometry alone does not guarantee original material performance. High-strength steel, ultra-high-strength steel, press-hardened steel, aluminum, and mixed-material structures have different repair limits.
A component that has buckled, torn, or exceeded its designed crush behavior may require replacement rather than pulling. Heating can also change the properties of some steels. I-CAR training materials and OEM procedures commonly emphasize following material-specific repair instructions, because a generic repair method can compromise strength.
Practitioner rule: if the OEM procedure says “replace,” a shop should not substitute “pull and heat” merely because the damaged section appears reachable.
Frame Testing Versus Frame Straightening: The Key Differences
Frame testing is an inspection and measurement service; frame straightening is a structural correction procedure. Testing applies little or no intentional force to the chassis, while straightening applies controlled force after the deformation and repair method have been established.
| Decision factor | Frame testing | Frame straightening |
|---|---|---|
| Main purpose | Diagnose structural deviation | Correct approved structural deformation |
| Metal stress | Normally non-invasive | Hydraulic pulling or pushing applies force |
| Typical equipment | Laser, measuring arm, tram gauge, OEM database | Frame rack, towers, chains, clamps, hydraulic system |
| Starting requirement | Vehicle access and reference points | Measurement report and approved repair plan |
| Typical labor time | About 2-4 hours | About 1-5 days for common repairs |
| Typical cost | About $150-$500 | About $600-$10,000 or more |
| Final proof | Dimensional report | Post-repair dimensional report |
| Related service | Damage assessment | Welding, parts replacement, alignment, calibration |
Which procedure comes first?
Frame testing normally comes first because technicians need to know what moved, how far it moved, and whether straightening is permitted. A shop may perform a preliminary visual inspection before testing, but a structural pull should not be planned from visual symmetry alone.
Some repairs require repeated testing. A technician may measure before pulling, during pulling, after the primary pull, and after component replacement. Multiple reports create a record of movement and help prevent over-pulling.
What Is the Difference Between Unibody and Body-on-Frame Damage?
Unibody vehicles integrate the passenger compartment, rails, floor, pillars, and crumple zones into one structural shell. Body-on-frame vehicles use a separate chassis frame beneath a body, although modern designs still contain important structural body components.
The terms “bent frame” and “frame damage” are often used loosely. On a unibody sedan, the damaged structure may be a front rail, apron, strut tower, rocker, floor section, or rear body panel rather than a removable ladder frame. On a pickup or SUV, the separate chassis may be measured while the cab and body also require inspection.
| Vehicle structure | Common measured areas | Typical repair decision |
|---|---|---|
| Unibody sedan | Front rails, aprons, strut towers, floor, rear rails | Pull, section, or replace according to OEM procedure |
| Unibody crossover | Rails, suspension towers, rockers, floor crossmembers | Structural repair plus ADAS and alignment checks |
| Body-on-frame pickup | Frame rails, crossmembers, suspension mounts | Pull, replace frame section, or replace chassis |
| Heavy-duty SUV | Chassis rails, body mounts, crossmembers | Measure chassis and body separately where required |
Unibody repairs demand special attention to crush zones and weld locations. A straight rail can still be unsafe if an adjacent apron, rail end, or energy-absorbing section is improperly repaired.
How Much Do Frame Testing and Straightening Cost?
Typical frame testing costs $150-$500, while frame straightening commonly costs $600-$10,000 or more. The final invoice depends on teardown, vehicle construction, regional labor rates, replacement parts, welding, corrosion protection, wheel alignment, calibration, and whether hidden damage is discovered.
The following ranges are typical planning figures, not guaranteed estimates.
| Scenario | Testing cost | Structural repair cost | Typical time |
|---|---|---|---|
| Pre-purchase dimensional inspection | $150-$300 | $0 | 1-3 hours |
| Minor rail or mounting-point deviation | $200-$500 | $600-$1,500 | 1-3 days |
| Moderate unibody pull with teardown | $250-$500 | $2,500-$6,000 | 3-10 days |
| Severe damage with section replacement | $300-$600 | $5,000-$10,000+ | 2-4+ weeks |
| Pickup chassis damage | $250-$600 | $3,000-$10,000+ | 1-4 weeks |
Labor estimates often change after disassembly. A bumper and fender can conceal a displaced rail end, crushed absorber, damaged wiring, or shifted suspension mount. Insurance estimates should therefore identify supplements and explain whether the estimate includes final measurement, alignment, ADAS calibration, and corrosion protection.
When Is Frame Straightening Unsafe or Inappropriate?
Frame straightening is unsafe or inappropriate when the OEM requires replacement, the metal has torn or buckled beyond repair limits, critical high-strength material has been overheated, or the shop cannot verify the final dimensions. A low price does not make a prohibited repair acceptable.
Common stop conditions include:
- Torn or fractured structural steel at a specified replacement location.
- Severe buckling in a press-hardened or ultra-high-strength component.
- Damaged mounting points that cannot retain their original geometry.
- Corrosion that reduces the remaining section’s strength.
- A frame or unibody shell with widespread deformation across multiple zones.
- Missing OEM procedures or unavailable reference dimensions.
- Evidence that previous repairs used incorrect sectioning, welds, or materials.
A salvage or heavily damaged vehicle may remain repairable, but the economic outcome can still be poor. Structural repair, paint, suspension, airbags, sensors, glass, trim, and rental costs can exceed the vehicle’s pre-loss value.
Can a shop heat high-strength steel during a pull?
A shop should not heat high-strength or ultra-high-strength steel unless the vehicle manufacturer expressly permits that method and specifies the temperature and process. Many modern components depend on controlled metallurgy, so torch heating can reduce their intended strength.
Cold pulling is often preferred where OEM instructions allow it. When cold pulling cannot restore the required geometry without excessive force, replacement may be the correct remedy. Ask the facility to identify the metal type and provide the applicable OEM repair instruction.
How Do Frame Repairs Affect ADAS and Vehicle Safety?
Structural displacement can change the mounting position and aiming angle of cameras, radar sensors, ultrasonic sensors, and other driver-assistance components. A vehicle may look straight after body repair while adaptive cruise control, lane-keeping assistance, automatic emergency braking, or blind-spot monitoring remains misaligned.
The correct sequence depends on the vehicle manufacturer, but a complete repair commonly includes:
- Pre-repair diagnostic scan.
- Structural measurement and repair.
- Suspension repair and four-wheel alignment.
- Replacement of damaged sensors, brackets, and wiring.
- Static or dynamic ADAS calibration.
- Post-repair diagnostic scan and road test.
A calibration warning is not the only concern. Some systems can report no fault while their aiming angle remains outside the required target. The repair record should state which systems were scanned, which calibration method was used, and whether a road test was completed.
What Should a Used-Car Buyer Ask For?
A used-car buyer should request the vehicle history, collision invoices, before-and-after measurement reports, parts information, alignment results, and ADAS documentation. Exterior panel gaps and fresh paint cannot establish that a prior structural repair met OEM dimensions.
Ask the seller or inspection facility:
- Was the vehicle measured before repair?
- Which reference points were outside specification?
- Was the structure pulled, sectioned, or replaced?
- Which OEM repair procedure governed the work?
- Were high-strength steels heated?
- Were airbags, pretensioners, sensors, and brackets replaced correctly?
- Is there a final dimensional report?
- Does the vehicle carry a salvage, rebuilt, or branded title?
- Will an independent shop inspect the underside and scan the vehicle?
A prior collision does not automatically make a vehicle unsafe. Missing documentation, unexplained structural work, uneven tire wear, persistent steering offset, water leaks, warning lights, and irregular panel alignment create a stronger reason to walk away.
How Can You Choose a Qualified Repair Facility?
Choose a collision center that can measure the vehicle with current OEM data, explain the structural repair method, document before-and-after dimensions, and complete required alignment and ADAS procedures. Equipment brands such as Car-O-Liner and Celette can support accurate work, but equipment alone does not prove technician competence.
Evaluate the facility using this checklist:
| Facility characteristic | Evidence to request | Why it matters |
|---|---|---|
| Computerized measuring | Sample redacted measurement report | Shows actual dimensional documentation |
| OEM repair access | Vehicle-specific procedure or database access | Repair limits vary by model and material |
| Structural equipment | Rack, clamps, towers, and approved fixtures | Prevents uncontrolled movement |
| Technician training | I-CAR or manufacturer training records | Supports process and material knowledge |
| ADAS capability | Calibration target and scan report | Confirms electronic safety-system completion |
| Quality documentation | Before-and-after photos and reports | Creates an insurance and resale record |
I-CAR certification is useful evidence of training, but it is not a substitute for vehicle-specific procedures. Ask who will perform the measurement, which database supplies the dimensions, and whether the final report will accompany the repair invoice.
Common Mistakes in Structural Repair
Straightening by eye
Visual symmetry cannot reveal a 5-millimeter shift in a hidden suspension pickup point or a diagonal mismatch under the floor. Require a dimensional report before authorizing a structural pull.
Treating alignment as proof of structural repair
A successful wheel alignment proves that wheel angles can be adjusted into specification. It does not prove that every structural reference point matches OEM dimensions.
Pulling without checking material type
Generic hydraulic force can damage a component designed to be replaced rather than reshaped. The technician should identify steel grade, aluminum construction, weld type, and OEM repair limits.
Ignoring secondary damage
A structural impact can damage wiring, brake lines, fuel systems, airbag sensors, seatbelt pretensioners, and battery components. A frame report cannot replace a complete safety inspection.
Skipping the final scan
A final structural measurement, alignment, diagnostic scan, and ADAS calibration create separate forms of proof. Omitting one leaves a measurable safety question unresolved.
FAQ
Can frame testing find hidden collision damage?
Frame testing can identify dimensional changes at accessible structural reference points, including displacement that exterior panels conceal. Testing cannot by itself identify every cracked weld, stretched fastener, damaged sensor, or compromised material property, so technicians must combine measurements with teardown and visual inspection.
How long does a frame test take?
A typical computerized frame test takes about 2-4 hours, including vehicle mounting and access to reference points. Extensive teardown, rust, unavailable targets, or prior repairs can lengthen the inspection. A pre-purchase inspection may take longer when suspension, airbags, electronics, and underbody damage are included.
Is frame straightening worth the cost?
Frame straightening can be worthwhile when the vehicle has substantial remaining value, the damage falls within OEM repair limits, and the facility can document the result. Repair is less attractive when structural replacement, airbags, paint, rental, and calibration costs approach the vehicle’s pre-loss value.
Can frame damage cause uneven tire wear?
Frame or unibody damage can cause uneven tire wear when it shifts suspension mounting points or changes thrust angle. Uneven wear can also result from incorrect alignment, bent wheels, worn bushings, or damaged control arms, so a structural measurement is needed before assigning the cause.
Does frame damage reduce resale value?
Documented structural damage or a branded title can reduce resale value because buyers and insurers associate the vehicle with greater repair uncertainty. High-quality repairs and complete measurement records improve confidence, but documentation does not erase a title brand or collision history.
Should I drive a vehicle before frame testing?
Avoid normal driving after a significant collision until the vehicle has been inspected, especially if steering, braking, suspension, airbags, fluid systems, or wheel position appear abnormal. A short movement by a qualified technician may be necessary, but road testing is not a substitute for structural measurement.
The Bottom Line
The difference between frame testing and frame straightening is diagnosis versus correction. Frame testing measures a vehicle’s structural geometry against OEM specifications, while frame straightening uses controlled mechanical force or approved component replacement to correct measured damage. For What Is the Difference Between Frame Testing and Frame Straightening?, the practical answer is to test first, repair only within OEM limits, and verify the finished structure, alignment, electronic systems, and safety equipment before returning the vehicle to service.


